RIFF JTAG Manager v1.58 RIFF Box Firmware v1.38 released (eMMC Support)

Hello,

Here is JTAG Manager v1.58 with ISP/Direct eMMC support.
To use it, please prepare Your RIFF Box installation folder:

– Rename JTAG Manager v1.56 so You can continue using it if Your account is expired
– Backup “Useful plugins” folder content because old plugins are incompatible with new Exe, and old exe is incompatible with new plugins.
– Start v1.58 exe and download license (If Your account is not expired)
– Update Box firmware to v1.38
– Download new plugins

Whats new:
JTAG Manager 1.58

—————————
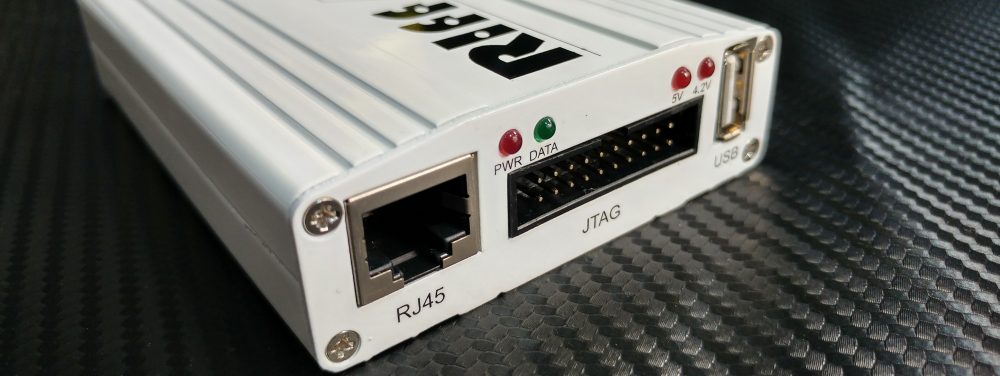
– Added direct eMMC Access Interface on the RIFFBOX RJ-45 port (check pinout picture for CMD, CLK, DAT0, etc pins positions).
– Added eMMC/SD Access page for Read/Write operations on eMMC/SD card via direct interface
– Added eMMC/SD Advanced dialog which allows to perform advanced operations with eMMC/SD cards
(reading info, browsing through OCR, CID, CSD (and EXT_CSD for eMMC only) registers’ fields, edit separate fields and writting back to card, reading/writting eMMC card’s MCU’s internal firmware, etc)
– Added convenient information presentation for specific eMMC chips: pinouts for testpoints, manuals how to use testpoints to resurrect dead eMMC, etc). These INFO files (*.riffinfo) are stored in JTAG Manager’s Documents folder and can be downloaded via generic <Check for Updates> operation.
– Added eMMC Firmware Update option
– Added eMMC Firmware Reading option (firmware is stored in *.riffemmcfw format)
For firmware read need to select chip from the list
– *.riffemmcfw eMMC firmware files are now used by RIFF for firmware updates (plain binary files are supported too)
– Added elapsed time info for eMMC firmware update stages
– Added eMMC Testpoint info displaying (info files must be downloaded from support and are located in the JTAG Manager’s ‘Documents’ folder.
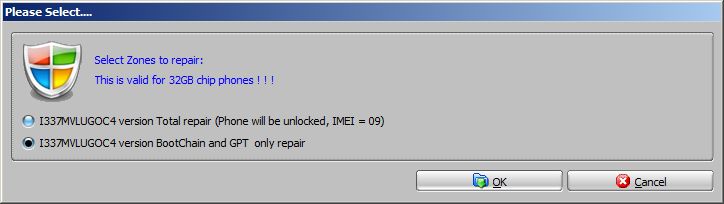
– Added CMD42 Lock/Unlock functionality for eMMC. User can set/change/remove password to protect/unprotect (lock/unclock) the User Area Partition
– Added the User Area Partition Forced Erase to erase Locked User Area Partition and to reset Device lock/unlock state and password (CMD42’s consequences)
– Added Samsung Factory Erase which erases and re-formats the Samsung eMMC chips.
– Fixed bug displaying wrong SD card size for cards capacity less than 2GB
– Few small improvements and bug fixes

Firmware v1.38
– Added direct eMMC Access Interface functionality
– Improved several parameters  in the emmc communication
– Added the CMD42 Lock/Unlock/Pasword reset features
– Added Forced erase of locked User Area Partition
– Added Samsung eMMC Factory Format
– Fixed bug with SD card support
– eMMC firmware update feature added

This version is available for download at support forum.

Important information related to RIFF Box eMMC support

Hello dear users !

This topic will serve as initial guide for RIFF Box eMMC ISP/Direct functionality. This is not regular update, but rather a major upgrade.
As such, it will come free for all RIFF Boxes registered in last 6 months, and of course for all new RIFF Box customers.

To prepare everything on Your side for this upgrade, You’ll need the following:

  • RJ45 cable
  • 3×100 ohms resistors
  • External source for VCC and VCCQ (Optional)
  • Moorc adapters (Optional)
  • Activation credits (If Your box is older than 6 months)

RJ45 cable is required to connect RIFF Box to eMMC as RIFF Box RJ45 port is used for this function.

3×100 Ohms resistors are required as pull up, to increase signal levels and improve stability.

Extarnal source for VCC and VCCQ is required in case that You don’t want to open Your RIFF Box, in order to connect RIFF Box internal VCC voltage source. We know that there are already some adapters on market, which offer this function.

Moorc adapters are well known, and they offer best at price range.

Activation credits You can get in exchange for some money. We have too many of those, and we will be happy to exchange some of them to real money.

RIFF Box RJ45 port pinout:

1-NC
2-SD_CLK
3-SD_DAT0
4-SD_CMD
5-NC
6-NC
7-NC
8-GND
VCC pin is located on RIFF Box motherboard, bottom side. You can locate it if You check attached photo.

Pull up resistors should be connected from VCCQ to SD_CLK,  SD_CMD and SD_DAT0 lines.

RIFF JTAG – Some of the beta tests with eMMC ISP

So, as already announced here, there is whole lot of users testing newly developed RIFF Box features. Here are some of the posts and logs:

Default

direct adopter connect emmc gt-i9300 emmc VTU00M

Open serial port…OK
Connecting to the RIFF Box…OK
Firmware Version: 1.38.3b, JTAG Manager Version: 1.57 [BETA 2]

Connecting to the SD/eMMC Card…OK
Set I/O Voltage reads as 3.30V, SD_CLK Frequency is 960 KHz

Memory Type …………………….. eMMC
Manufacturer ID …………………. 0x15
OEM/Application ID ………………. 0x00
Product Name ……………………. “VTU00M”
Package ………………………… BGA
User Area Parition Size ………….. 0x0003AB400000 Bytes (14.68 GB)
Boot Partition Size ……………… 0x000000200000 Bytes (2.00 MB)
RPMB Partition Size ……………… 0x000000020000 Bytes (128.00 KB)
OCR Register ……………………. 0xC0FF8080 (Dual Voltage, High Capacity)
Write Protection Bits ……………. NONE
Boot Configuration ………………. Boot from Boot Partition 1 (Bus Width = 4Bit)
Chip Revision …………………… 15.12
Multimedia Card Revision …………. 1.6 (eMMC v4.5, v4.51)
Serial Number …………………… 0x3D398686
Memory Manufacturing Date ………… May, 2014

Open serial port…OK
Connecting to the RIFF Box…OK
Firmware Version: 1.38.3b, JTAG Manager Version: 1.57 [BETA 2]

Connecting to the SD/eMMC Card…OK
Set I/O Voltage reads as 3.30V, SD_CLK Frequency is 960 KHz

Detected eMMC Chip, ID: 0x15/0x00 (VTU00M), User Area Partition = 0x0003AB400000 Bytes (14.68 GB)

Reading “User Area Partition” address space from 0x000000000000 to 0x000001FFFFFF
Completed in 00:06:33.669 (Average Transfer Rate: 83.24 kB/s)

Smile Samsung S5282 ISP Connection Successful

Connection Method: ISP
Hand Set Model: Samsung S5282
Phone Status: Alive
Reason: Emmc Backup and Riff box Application TestingProblems encountered: I was unable to scan or read the handset with Riff.
Solution: I have soldered the 5K pull ups on Pin 2 and 3 of the RJ45 to Pin 9(VCC/VCCQ) Of Riff Box.Pinouts used: Z3x S5282 EMMC pinoutsRiff Box LogsOpen serial port…OK
Connecting to the RIFF Box…OK
Firmware Version: 1.38.3b, JTAG Manager Version: 1.57 [BETA 2]

Connecting to the SD/eMMC Card…OK
Set I/O Voltage reads as 3.28V, SD_CLK Frequency is 393 KHz

Memory Type …………………….. eMMC
Manufacturer ID …………………. 0x15
OEM/Application ID ………………. 0x00
Product Name ……………………. “S5U00M”
Package ………………………… BGA
User Area Parition Size ………….. 0x0000E9000000 Bytes (3.64 GB)
Boot Partition Size ……………… 0x000000200000 Bytes (2.00 MB)
RPMB Partition Size ……………… 0x000000020000 Bytes (128.00 KB)
OCR Register ……………………. 0xC0FF8080 (Dual Voltage, High Capacity)
Write Protection Bits ……………. NONE
Boot Configuration ………………. Boot from Boot Partition 1 (Bus Width = 1Bit)
Chip Revision …………………… 0.10
Multimedia Card Revision …………. 1.5 (eMMC v4.41)
Serial Number …………………… 0x7D4BB668
Memory Manufacturing Date ………… February, 2014

Phase 2: Read the partitions of the hans set and post results.

Partitions Read: BOOT PAT1, BOOT PAT2, RPMB Area PAT.
Status: All Susscessful(RIFF BO ROCKS 🙂 )

Logs

Open serial port…OK
Connecting to the RIFF Box…OK
Firmware Version: 1.38.3b, JTAG Manager Version: 1.57 [BETA 2]

Connecting to the SD/eMMC Card…OK
Set I/O Voltage reads as 3.28V, SD_CLK Frequency is 960 KHz

Detected eMMC Chip, ID: 0x15/0x00 (S5U00M), User Area Partition = 0x0000E9000000 Bytes (3.64 GB)

Reading “Boot Area Partition 1” address space from 0x000000000000 to 0x0000001FFFFF
Completed in 00:00:23.837 (Average Transfer Rate: 85.92 kB/s)

Open serial port…OK
Connecting to the RIFF Box…OK
Firmware Version: 1.38.3b, JTAG Manager Version: 1.57 [BETA 2]

Connecting to the SD/eMMC Card…OK
Set I/O Voltage reads as 3.28V, SD_CLK Frequency is 960 KHz

Detected eMMC Chip, ID: 0x15/0x00 (S5U00M), User Area Partition = 0x0000E9000000 Bytes (3.64 GB)

Reading “Boot Area Partition 2” address space from 0x000000000000 to 0x0000001FFFFF
Completed in 00:00:23.852 (Average Transfer Rate: 85.86 kB/s)

Open serial port…OK
Connecting to the RIFF Box…OK
Firmware Version: 1.38.3b, JTAG Manager Version: 1.57 [BETA 2]

Connecting to the SD/eMMC Card…OK
Set I/O Voltage reads as 3.28V, SD_CLK Frequency is 960 KHz

Detected eMMC Chip, ID: 0x15/0x00 (S5U00M), User Area Partition = 0x0000E9000000 Bytes (3.64 GB)

Reading “RPMB Area Partition” address space from 0x000000000000 to 0x00000001FFFF
Completed in 00:00:01.482 (Average Transfer Rate: 86.37 kB/s)

Default Connect & Read Dump SM-T211 EMMC M8G1WA .. Done

Connect & Read Dump SM-T211 EMMC M8G1WA .. Done

Conecting with Riff box

Open serial port…OK
Connecting to the RIFF Box…OK
Firmware Version: 1.38.2b, JTAG Manager Version: 1.57 [BETA 2]

Connecting to the SD/eMMC Card…OK
Set I/O Voltage reads as 3.28V, SD_CLK Frequency is 1 MHz

Memory Type …………………….. eMMC
Manufacturer ID …………………. 0x15
OEM/Application ID ………………. 0x00
Product Name ……………………. “M8G1WA”
Package ………………………… BGA
User Area Parition Size ………….. 0x0001D2000000 Bytes (7.28 GB)
Boot Partition Size ……………… 0x000000200000 Bytes (2.00 MB)
RPMB Partition Size ……………… 0x000000020000 Bytes (128.00 KB)
OCR Register ……………………. 0xC0FF8080 (Dual Voltage, High Capacity)
Write Protection Bits ……………. NONE
Boot Configuration ………………. No Boot
Chip Revision …………………… 0.10
Multimedia Card Revision …………. 1.5 (eMMC v4.41)
Serial Number …………………… 0xF2A45264
Memory Manufacturing Date ………… February, 2014

 LENOVO k900 EMMC MAG2GA connect Successful

Code:
Open serial port...OK
Connecting to the RIFF Box...OK
Firmware Version: 1.38.3b, JTAG Manager Version: 1.57 [BETA 2]

Connecting to the SD/eMMC Card...OK
Set I/O Voltage reads as 3.30V, SD_CLK Frequency is 960 KHz

Memory Type .......................... eMMC
Manufacturer ID ...................... 0x15
OEM/Application ID ................... 0x00
Product Name ......................... "MAG2GA"
Package .............................. BGA
User Area Parition Size .............. 0x0003A3E00000 Bytes (14.56 GB)
Boot Partition Size .................. 0x000000200000 Bytes (2.00 MB)
RPMB Partition Size .................. 0x000000020000 Bytes (128.00 KB)
OCR Register ......................... 0xC0FF8080 (Dual Voltage, High Capacity)
Write Protection Bits ................ NONE
Boot Configuration ................... No Boot
Chip Revision ........................ 1.5
Multimedia Card Revision ............. 1.5 (eMMC v4.41)
Serial Number ........................ 0xFE1E4658
Memory Manufacturing Date ............ May, 2012

direct EMMC VCC = VCCQ = 3V3

RIFF JTAG – Samsung SGH-i337M Galaxy S 4 LTE Total Repair supported

RIFF JTAG – Samsung SGH-i337M Galaxy S 4 LTE Total Repair supported

– This PKG contains GPT for 32GB chips !
– There is both Total Repair ™ and BootChain only repair options

Use “Total Repair” option in case that EFS is damaged after unlock. Otherwise use BootChain only option.

337m

Please keep in mind that it’s not possible to downgrade this phone to lower version software !
.
samsung_galaxy_s_4_2

RIFF JTAG – Asus Padfone A66 bootloader repair supported

RIFF JTAG – Asus Padfone A66 bootloader repair supported

– This PKG contains BootChain partitions for 5 different MCU ID-s. To select proper BootChain pack, read MCU ID first by using “Analyze JTAG Chain” function on JTAG Read/Write TAB.
– GPT is from 32GB version !
– Android Kernel and Recovery are same for all versions

a66
In case that You have to wipe Cache partition, and it can’t be done via recovery, You can do it by using eMMC Plugin:

– Start eMMC plugin
– Click “Load layout from device”
– Double click “Cache” partition
– Click “Flash Selected”

This will write zeros to Cache partition and practically wipe it’s content.
.
asus_padfone_3

RIFF Box – list of latest updates

This is the list of custom repair packs released in last few months:

  • Andromax U R-W.riffpkg
  • Asus_Nexus_7.riffpkg
  • Brava Vega3.riffpkg
  • Casio GZone CA201L.riffpkg
  • Highscreen_Spark.riffpkg
  • HTC 8S Total Repair (PM5910001).riffpkg
  • HTC Amaze Both MID Safe Repair.riffpkg
  • HTC Desire 300 G3U.riffpkg
  • HTC Merge.riffpkg
  • HTC One M7 U PN07120.riffpkg
  • HTC One Max 0P3P70000.riffpkg
  • HTC One Max.riffpkg
  • HTC_Desire_606w_PO49100.riffpkg
  • HTC_Desire_U_T327w.riffpkg
  • HTC_Desire_X_Dual.riffpkg
  • HTC_OneM7_PN0731000.riffpkg
  • HTC_OneMini_PO5810000.riffpkg
  • HTC_OneMini_PO58220000.riffpkg
  • HTC_OneSV_PL8011000.riffpkg
  • HTC_One_S_PJ40110_VLE.riffpkg
  • HTC_One_XL_Evita_UTL.riffpkg
  • HTC_Rezound_Total_Repair.riffpkg
  • HTC_Sensation_XE_Both_ID.riffpkg
  • Huawei_Y300_151.riffpkg
  • I9192UBUBMK4.riffpkg
  • LG SU640.riffpkg
  • LT30A H.riffpkg
  • Lumia_525.riffpkg
  • Micromax_A111.riffpkg
  • Motorola MB886.riffpkg
  • Nokia_XL_RM-1030_Beta_Test.riffpkg
  • Nokia_X_RM_980.riffpkg
  • Nokia_X_RM_980_V2.riffpkg
  • Novatel_4620L.riffpkg
  • Novatel_U727_Modem.riffpkg
  • OPPO X907 Finder.riffpkg
  • P3100_16GB_XLoader+.riffpkg
  • Pantech_UM185C.riffpkg
  • Prestigio_PAP5300.riffpkg
  • Qualcomm MSM8625.riffpkg
  • S6310 Total Repair.riffpkg
  • S7562_Total_Repair.riffpkg
  • Samsung B229.riffpkg
  • Samsung i747 EFS.riffpkg
  • Samsung S5283.riffpkg
  • Samsung S6310 Total Repair.riffpkg
  • Samsung S6310N Total Repair.riffpkg
  • Samsung S6312 Total Repair.riffpkg
  • Samsung_GT-I9190_V4.2.2.riffpkg
  • Samsung_GT-I9200_V4.4.2.riffpkg
  • Samsung_i527_442.riffpkg
  • Samsung_i705.riffpkg
  • Samsung_i747_4.4.2_NE6.riffpkg
  • Samsung_R970.riffpkg
  • Samsung_R970C.riffpkg
  • Samsung_S5310.riffpkg
  • Samsung_S5310B.riffpkg
  • Samsung_t999v_EFS_repair.riffpkg
  • SE LT30A.riffpkg
  • Sony_LT28i_Ion_Test.riffpkg
  • XPERIA Z C6602.riffpkg
  • Xperia_Z_LTE_C6603.riffpkg
  • XPERIA_Z_Repair_Null_BaseBand.riffpkg

RIFF JTAG – Easy repair Micromax E390 supported

RIFF JTAG – Easy repair Micromax E390 supported

Repairing bricked Micromax E390 is easy with the RIFF Box.

To resurrect Micromax E390:

  •  Solder JTAG cable to Micromax E390 JTAG pads;
  •  Insert USB Data cable into board and PC;
  •  Make sure Micromax E390 is selected in the list of models;
  •  If you use battery, press Power On key;
  •  Click Resurrect button;
  •  Wait till software signals a successful operation completion;
  •  Disconnect power supply, de-solder JTAG wires;

.

e390-feature-img3

RIFF JTAG – Easy repair Gigabyte GSmart G1342 Houston supported

RIFF JTAG – Easy repair Gigabyte GSmart G1342 Houston supported

Repairing bricked Gigabyte GSmart G1342 is easy with the RIFF Box.

To resurrect Gigabyte GSmart G1342:

  •  Solder JTAG cable to Gigabyte GSmart G1342 JTAG pads;
  •  Connect USB cable or insert battery;
  •  Make sure Gigabyte GSmart G1342 is selected in the list of models;
  •  Click Resurrect button;
  •  Wait till software signals a successful operation completion;
  •  Disconnect power supply, de-solder JTAG wires;

Now phone is in bootable condition, that is, even if it does not start up normally, you can flash it using known flashing methods.
.
gsmart

RIFF JTAG – Easy repair Gigabyte GSmart Rio R1 supported

RIFF JTAG – Easy repair Gigabyte GSmart Rio R1 supported

Repairing bricked Gigabyte Rio R1 is easy with the RIFF Box.

To resurrect Gigabyte Rio R1:

  •  Solder JTAG cable to Gigabyte Rio R1 JTAG pads;
  •  Connect USB cable or insert battery;
  •  Make sure Gigabyte Rio R1 is selected in the list of models;
  •  Click Resurrect button;
  •  Wait till software signals a successful operation completion;
  •  Disconnect power supply, de-solder JTAG wires;

Now phone is in bootable condition, that is, even if it does not start up normally, you can flash it using known flashing methods.
.
RIO_R1_pop02

RIFF JTAG – Easy repair HTC J One HTL22 supported

RIFF JTAG – Easy repair HTC J One HTL22 supported

Repairing bricked HTC HTL22 (PN0740000) is easy with the RIFF Box. Phone is auto powered on with USB Data Cable connected to the PC. Battery presence may be required.
In case you have no USB cable near, make sure battery is charged enough and hold Power On button during initiation of JTAG connection.
Resurrector will reflash radio’s boot zone and will re-write PDA’s SPL to 1.52.0000 version. Additionally to SPL and Radio zones, the zone which contains Model ID is re-flashed too. Thus after resurrection phone will have Model ID = ‘PN0740000’.

To resurrect HTC HTL22:

  •  Solder JTAG cable to HTC HTL22 (PN0740000) JTAG pads;
  •  Insert USB Data cable into board and PC;
  •  Make sure HTC HTL22 (PN0740000) is selected in the list of models;
  •  If you use battery, press Power On key;
  •  Click Resurrect button;
  •  Wait till software signals a successful operation completion;
  •  Disconnect power supply, de-solder JTAG wires;

Now phone is in bootable condition, that is, even if it does not start up normally, you can flash it using known flashing methods.

To enter download mode:

  •  Disconnect PC cable;
  •  Insert battery;
  •  Hold ‘Volume Down’ key and press ‘Power ON’ button.

.
130220-new-htc-one-021